Dec 2, 2013

Dalton St. Garage, Waterville, ME (Completed Jan 18th, 2014)

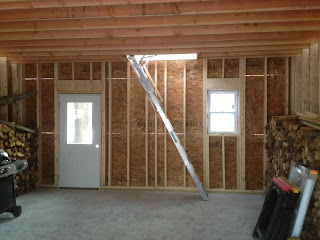
This couple came to me with a request by reference of another friend of mine. They wanted a quote on how much a garage would cost them to have me build. I gave them a cheaper estimate than I should of because I was eager to jump into a new build so in hindsight the only thing I would change about this job is the time of year I chose to build it! Day 1 of this job began on December 2nd and the plans are a building 22'-20', 2"x 6" for studs, 16" on center, to allow for a more insulation. I chose balloon style framing over platform style framing because it saved on materials and labor. I also promoted a hemlock 1"x 6" sub flooring as a plywood alternative for the second level, it saved a little bit of the cost but compared to the time it took to install it, it is hard to decide what was a best decision financially. Building in December meant I got frozen wood, so my time doubled installing that material just getting the ice off. As for everything else it has gone accordingly, 1/2 CDX plywood OSB on the sides and 7/16 CDX plywood OSB on the roof. I am building it as if the garage was built at the same time as the home. My mission when I began was to make it seem as though it was always there, the garage next to the house. If i keep that in mind most of my work comes out looking alright. So i have a 1'-0 overhang going around the building, the fly rafter was a first for me and so far so good! It looks good. I installed a 7'-16' ft Wayne Dalton torsion spring garage door, fully insulated. That was my first time installing a torsion spring door. I will never recommend another door after that. The massive door is effortless to lift with torsion springs like those to carry it. I also chose to do a cross-brace bridging between the 2"-12"-20' joists. Something i had never done and it came out great! It easy to wire and looks very ornate! The code officer came and gave me my first structural PASS, he had no complaints or questions. Check out the pictures and let them do the explaining for the rest of this post.


The finished building!  ( we did not contract any sidingC)  

Nov 18, 2013

The Old Farm House That Did!

Kitchen flooring in progress
This old house was a diamond in the rough that a friend of mine's Dad bought in the town of Fairfeild, ME. This place was a work in progress in every corner of the home. I have done a fair amount here and there. I had taken out walls, to create space and put in a few headers for doors and windows. I threw in a door going down to the basement which involved re-framing a partly exterior wall. The only photo's I have up now are just the one of the 1/4" Bamboo flooring i put in his kitchen, backroom and the will-be bathroom for him. A great flooring type, semi-brittle compared to hardwood, it will split if you shoot a finish nail too close to an end of the plank. But overall a very neat and clean installed! Note: this flooring will not go down without finish nails, they recommend a pneumatic floor nail gun but the tongue on those boards is less that an 1/8th of an inch, even the finish gun was splitting the tongues of those board so I would not recommend a heavy flooring nail
gun. Check it out!

The finished kitchen
Mudroom rebuild, I removed a wall and added a header, just
in case, it did not appear to be load bearing but it never hurts
to overbuild something. 


This picture to the right was a very fun project as one of my favorite challenges in an old home is to build something that appears to have existed all along. I had some reclaimed barn sheathing from a shed I ripped down years ago that I donated to this project and it came out great! Same thickness wood so it made for a semi-seamless insert. The whole point of this door was to gain access to the basement level so I cut into the sheathing in order to frame it for a door! 

Oct 14, 2013

May St. Window Trim Work

This work was done with a client, Lisa, who asked me to do some trim work in her kitchen and front doorway! The type of trim chosen was a challenge because of the profile of door trim in the rest of the home being so old. A 3/4" x 3 3/8" Pine Stafford was used as a close substitute. 


Sep 3, 2013

May St. Radiators

This was a fun opportunity too get involved with a sandblaster to take all the many coats of paint off of a frequent client's radiators. I happily accepted. The videos and photos do this job its justice but what I lack are photos of the original radiators with all the paint but you can still see the process and the result there at the end! Check it out


Jan 6, 2013

1984 VW Vanagon Welding Project


This vehicle restoration was one I took on for a cross-country trip I underwent with my brother Andrew and a close friend of ours, Adam, during the summer of 2013. I found the van on craigslist in Pennsylvania and when it got back to Maine, the turmoils of an antique vehicle began to reveal themselves slowly. Never the less, when the winter maintenance was for the most part through, I hatched the plan to build a gas tank and spare tire rack on the rear end of the vehicle, as well as a bike rack on the front. The bike rack was sufficient and easy enough but the effort really when into the construction of the bumper, on the images below all of the work can be seen stage by stage. Even my beginning doodle.

This was the type of camper I bought for the trip
This is the plan that i came up with for the rear bumper, I like to
note that the total cost was $180.00 in steel and trailer barrings.


The completed bumper


            The Black Hills National Forest in South Dakota