Jul 21, 2011

Old Apartments

This was a fun project for sure, I offered my Dad in 2011 to paint his apartment buildings at an hourly rate for minimum wage, until I was finished. The only catch was he had to agree to get me a paint sprayer, and off I went, check out these  before and after photos.


 This is essentially what I had done to all four sides.
PRIMED


Before and After


This is also a neat photo I came across one day, its a photo of the apartments back in there younger years, I have put a photo below of the apartments in present day 2010 as a comparison. The comparison photo was one before I painted the apartment building on the left.


Jul 20, 2011

Wisconsin Fencing

This project was a spur of the moment build in the summer of 2011, while visiting my cousin, we decided she needed new fence posts. So with a semi-strict budget we decided to do a cascading cedar fence corner property accents. This was new for me as I had only ever worked with the stockade style fencing, so i was eager to throw up my first cedar fencing!


Jul 19, 2011

Sewing Machine Box

This is a box that I was encouraged by my father to build for my stepmother for her sewing machine. I made this during my first years of playing around in my basement with my tools. It is made from a scrap section of panel waynes coating, strapping and a piano hinge. With a maple board for the top, I finished it with a dark cherry stain and a polyurethane. I learned here a technique for achieving that soft feel that polyurethane can give a surface, which is by finely sanding it with a 500 or 600 course sand paper. I also learned that a brown paper bag holds a very similar result when used to finish sand a surface. Fun little project for someone who was learning the very beginner-ropes of carpentry! 


May 11, 2011

Basement Renovation


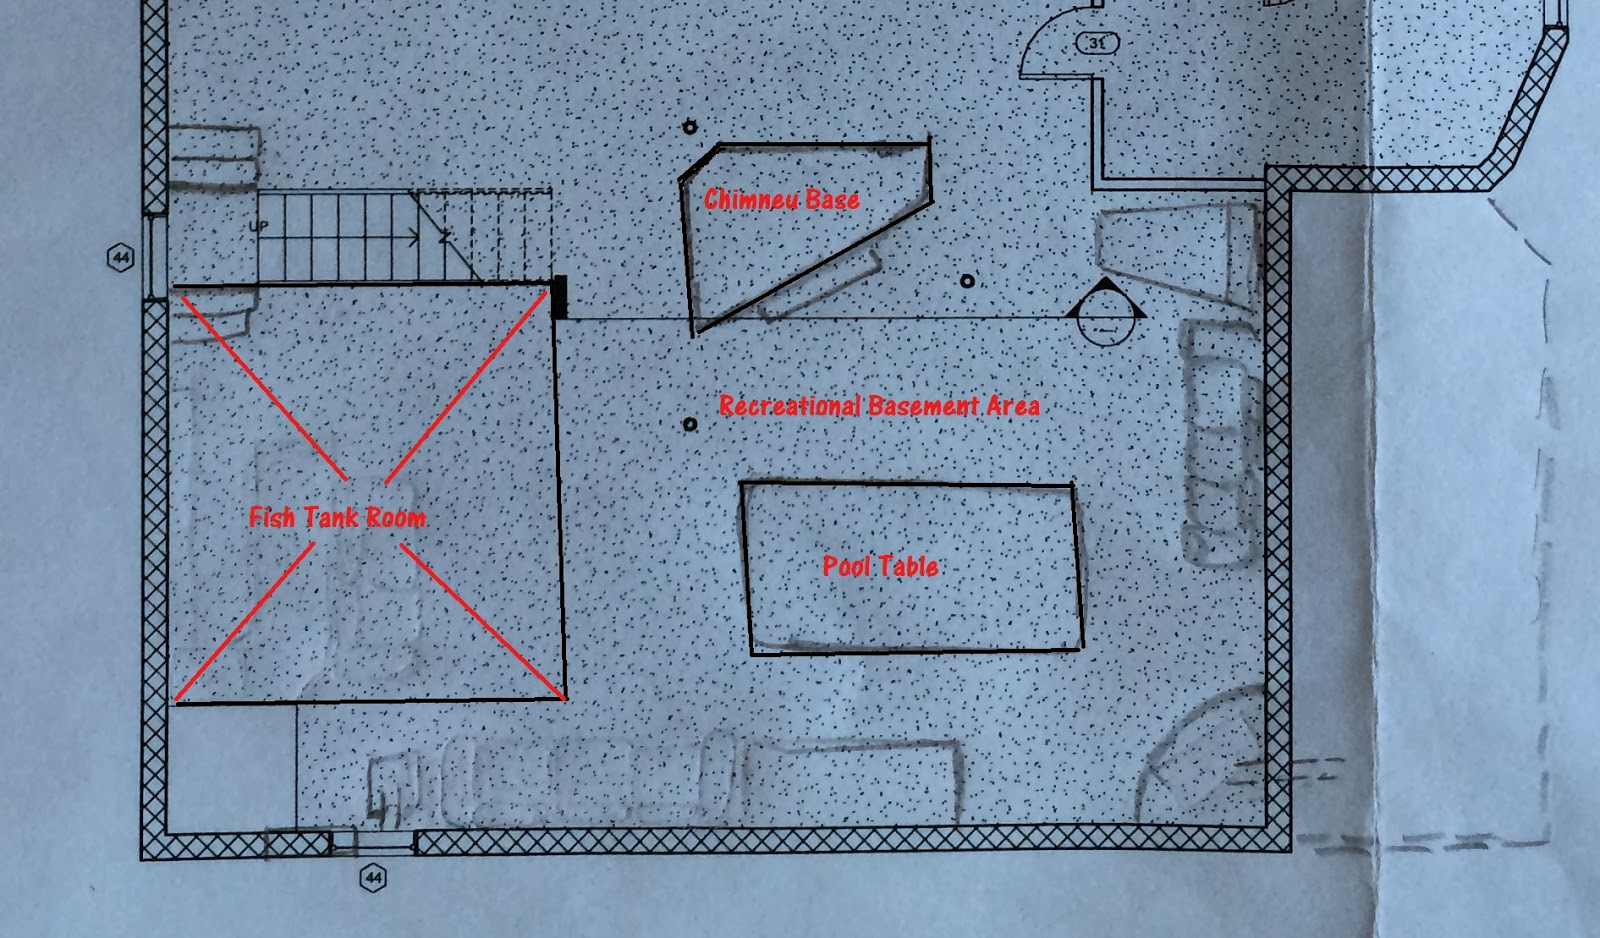
This is what the floor plan was in the basement of  my big old house, the Summer of 2011. I hatched an idea to remove an old fish tank room from our basement that was a never-use room. Upon initial inspection, it looked pretty safe to remove, nothing structural hiding in the walls, just a silencing beam above the room. Myself, and some friends, removed the room and we discovered quit a few hidden issues, not to mention i found a Zippo brand lighter in one of the walls. But for one thing the foundation floor has been severely eroded by a tunneling animal from years and years ago, i found news paper clippings all shredded under the slab inside the small tunnels. My analysis, at a point in time the old owners had the critter removed as there was concrete patches in the floor. But the tunnels still remained and worsened from a foundation wall crack. When that developed the water came in and found an exit through the tunnels under the slab, and so i began repairing immediately. This was what the floor plan was..


This is what i wanted it to be when it was finished. From one room we did not use, it nearly doubled the space in the recreational section of the other room.

This is the time frame i discovered the minor holes in the floor where not so minor and the tunnels under the floor networked pretty far towards the the open area in the basement. In the other photos leading on, I found what I can only claim was an older foundation wall, or a strange brick footing for the slab or wall?


I went and dug the outside wall out as well because their is not much point in fixing the inside unless you seal and waterproof the outside so there I am brushing the loose concrete out and prepping the crack for concrete and rubberized tar.


There is that strange brickwork under that slab i mentioned


 And the final slough of pictures is the pouring of the new concrete to fill in the hole.......


This is the lighter I discovered in the wall


 This is the bar, from frame to finish. My Dad gave me his restrictions on what it had to look like. It has to have two-way swinging western style doors and he appreciated the hardwood floors i chose so much that we decided to use the excess flooring to make the bar-top.
 This was the 6"x 6"x 16' KD replacement silencing beam we hiked home from the lumber company down my street. My Dad dropped us off  but needed his car so the only option was walking it back over our shoulders, we were eventually picked up by a friend and carried home.

Jul 4, 2010

The Party Barn as it was referred too

The Party Barn was a structure my Dad authorized me to build in the summer of 2010 just after the pool was finished. It is a 14' wide by 16' long gable roofed shed. Build from rough-cut lumber from a local milling operation, the total materials cost for this structure, including slab was about $3,500.00. That was the only way I convinced my dad into letting my build it at the time. The photos exhibit the day by day work and you can see, for example what went into prepping of the site for a slab and the beginning and end results, pretty fun build for a 17 year old. I did have the guidance of a contractor family friend, Micheal, who came by before his work every morning around 7:00 to give me the low down on how to do everything on each day. The cupola was an afterthought of my dads. One thing I learned with that was do not build too heavy because we had to hoist it up to the peak of the roof copper and all, it worked out but it could have been easier!


 These are the plans I was given to build mine off of. These came from a garage kit draft plan. So I built mine and took it down the street from my house to a local metal-works shop to have them put a copper for a roof on it.