Jun 8, 2015

Southern Yellow Pine Flooring

This is one of the more ongoing clients I am working for currently. He is a new resident to the Island of Chebeague off the coast of Casco Bay ME. He bought this little cottage off the johns small rd. on the island and I happen to spend a large amount of time out there already so when I am working for him I am living out there as well.

In this short series of photos you can see flooring being installed. The species of wood flooring is southern yellow pine (SYP). Which is the harder pine and very suitable for flooring. SYP is what the cottage has in every other room so I picked up where the old house left off venturing into the large bedroom additions.


Estwing Pride

In this photo, and it is not quite clear, but that darker flooring is the older yellow pine and you can clearly see the new stuff unfinished. Here I am working my way down the hallway to reach the bedrooms.   

One bedroom DONE!


This series of greatly lite photos you can tell how I begin flooring such as this. It can be done with a chalk line but I prefer a stringline. Making sure to measure off the finishing wall to the first board so you can stay parallel and end evenly with the butting wall. You can also see gabs which I have left to allow for expansion.


SYP Flooring Completed in Bedroom #2!


Jun 5, 2015

Water for Ants: Where there is moisture.. there are ants.

This was what I was hired to replace: One Stove Vent

I met with this couple to replace two simple things around the exterior of the home. Two vents, one dryer vent and one stove vent. I gave them a price and once I made my way toward replacing the stove vent, I knew it was going to have other issues just by the looks of it. The vent was causing water issues years ago (I was not told this before starting) and the home is 19 years old. This vent was installed by the contractor that built the home and the homeowner ended up having to caulk around that vent years later because it was only screwed. No flashing, no j-channel, no redundancy.


Looks pretty moist in there! 


Mold

Caulking under the siding

In these photos its hard to see but the first course of vinyl was caulked to the foundation. Now this would not be an issue if only a little water came in once a year on a freak driving rain. BUT this wall had bulk water coming in with no way out at the bottom. 


The resulting damage! 

Typically, water inside the building envelope provides a source of water for insects so they don't have to leave to grab a drink. Additionally inside their warm, wet home they can dip inside your home for a little sugar snack every now and then too without the colony being discovered. In this case carpenter ants would come in and graze the counters in small numbers whenever the homeowners would cook. They hired me for a vent and I opened a wall of ants on them!


 The drywall was intact thanks too the insulation keeping the water off the drywall and so you can see here how I removed all rotten and moist wood from the wall and re-framed the wall with fresh studs and insulation.


Blocks to strengthen the cut on both sides of the stud.


Sheathing on top of the frost wall
The original wall sheathing was installed RIGHT on top of the foundation wall and as you can see the homes structure settled and shrunk and the engineered plywood didn't. So it happened to bulge out right down at the base of the wall.  


Through the last and final restore steps, I did not manage to take any photos of the metal bending or the roofing application because this whole job was unexpected and a priority once it was discovered so I had to act fast in order to not push my scheduled jobs back too far. This took three days. 


In this photo to the right, their is now kick-out flashing on the roof/ exterior wall. This flashing detail is CRUCIAL!! Bulk was travels down the roof and siding inside the channel of vinyl that goes down the roof. Half of all that water over 19+ years was going behind the siding and down over the sheathing. Now at the end of the channel it is deterred (kicked out) from the channel and into the gutter! 
All because of one terribly flashed stove vent and a lack of flashing on the wall to kick water away. The gutter was somewhat clogged too so that was another contributor to the damage but the lack of kick-out flashing was the biggest one. Also don't caulk vinyl siding to the foundation. 


Kick-out your bulk water and install your stove vents properly... or this could be your house. 


May 9, 2015

McIntosh and Co. Cabinetmakers

 On Tuesday May 5th, I came in and began painting shelves for Todd (the co. owner). These pieces were going into his home. That was a quick task, I then moved onto hand sanding many, many pieces that were primed. After wood is primed it tends to raise the grain in the wood so to get it smooth to the touch for a finish coat of paint these trim pieces needed to be "rubbed out" or hand sanded with a 120 or 220. 


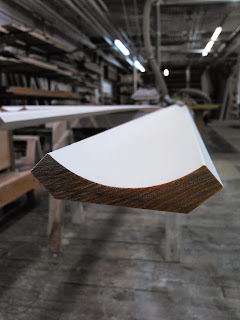
This photo above and below is the mock-up of the ceiling trim package that consist of the assembled pieces I am sanding and stacking for shipment. 


Some cove mouldings


At the end of the day this is the amount of wood I sanded by hand. It was a dusty days. Definitely wore a respirator. 

Thursday, May 7th I sanded some units again for the owners home and then brushed on a poly oil finished once the pieces had the smoothness he wanted. There was less hand sanding this day then the day prior but more meticulous sanding for sure. 


Externship Summary:

My experience with McIntosh and Co. Cabinetmakers was incredibly valuable in that it allowed me a glimpse into the day to day of a cabinetmaker and the different rolls that each employee in this production shop played. Each employee operated differently in speed and the task they were working on was usually different. I was able to see briefly how someone manages time during the process of building an entire home's worth in cabinetry that cost hundreds of thousands of dollars. The whole experience was great, I was able to apply the squaring techniques that I learned at CMCC toward the assembly of boxes and face frames that I worked on during my time there. I also gained knowledge that strengthened my wood species identification skills. Every single day was a new challenge and if you have an open mind for new information their are endless tips and tricks you can learn in a cabinet shop such as this. 

    I fully recommend taking on an externship through Central Maine Community College! 

It was so beneficial to me because it made me rethink my idea for an end-career-goal. I never thought that I would enjoy it more than what I was practicing now which is residential building and construction. I enjoyed very much the localized aspect of this kind of shop work and the level of artistry in cabinetmaking. And it wasn't always cabinetmaking either, occasionally I got to work on ceiling casements packages, custom moldings and other furniture pieces as well. So if your hesitant on trying something like this or any other externship for that matter, it will only make your decision for an end-career-goal very clear. You may dislike it or you may end up enjoying it very much like I did in this case.

Building Concepts Course CMCC- Week 28 Final Exams Week

For the last week, we did our competency testing consisting of in-shop exercises and computer tests. With our other time in class we spent it wrapping up the freeze boards on our sheds and doing all the punch list type things that come with competing small buildings, sinking nail heads and touch up paint, that kind of stuff.   

 Once the sheds were totally done we worked on cleaning the shop from top to bottom. As well as completing small tasks around that were just things to help the shop function more efficiently. In the two photos here you can see the aluminum angle iron I cut and installed onto two rolling carts we have in the shop. 


 Lastly we took a group photo. Myself on the right end and my three classmates /friends. We all worked on the timber frames together and spent quit a lot of time together these past two semesters. We took and photo to immortalize the moment as one of those students completely finished at CM and we wont be seeing him next year! 


Clean shop...


clean shop...


 and clean shop!